 Thailand
What is a TR visa and when do you need it
If you are going to Thailand for up to 30 days, you do not need a visa – visa-free entry is enough. But if you plan to stay longer than a month, take a closer look at a single-entry or multiple-entry TR visa. It gives 60 days immediately on arrival, and you do not need to think about leaving the country to reset the clock. You can also extend this visa inside Thailand for another 30 days at an immigration office, although this is not guaranteed; the final decision is made by the immigration officer.
| Option | Validity (when you can enter after issue) | Length of stay (how long you can stay after entry) | Can be extended | Cost |
|---|---|---|---|---|
| Visa-free entry | — | 30 days | +30 days at an immigration office (1,900 THB, 56.53 USD), not guaranteed | free |
| TR single entry (Single Entry) | 3 months from date of issue | 60 days | +30 days at an immigration office (1,900 THB, 56.53 USD), not guaranteed | 40 USD (40 USD) |
| TR multiple entry (METV) | 6 months from date of issue | 60 days per entry | +30 days per entry, not guaranteed | 200 USD (200 USD) |
A single-entry visa suits most independent travelers: it is enough for one long trip around Thailand and neighboring countries with a return. A multiple-entry visa (METV) is better for those who plan to enter Thailand several times within six months or travel around Asia often. METV requirements are usually stricter, and the visa fee is higher.
How multiple-entry differs from single-entry
A multiple-entry visa is valid for 6 months from the date of issue. During this time, you can enter and leave Thailand an unlimited number of times. Each entry gives 60 days of stay, which can be extended by another 30 if desired. To get a new stamp, you need to leave the country and re-enter within those 6 months – it can be a short trip to Laos, Malaysia, or Cambodia, or a flight to a third country.
What is great is that the 60 days are counted from the date of entry, not from the visa issue date. So if you enter Thailand a few days before the end of the 6-month validity of the multiple-entry visa, you will still get your 60 days. For example, with a visa issued on January 1, you can enter on June 25, stay until August 24, extend for another 30 days, and leave only at the end of September. In total, during the 6 months of the multiple-entry visa, you can spend almost a full 9 months in Thailand.
If you plan to stay in Thailand even longer or are considering other grounds for stay – from studying to remote work – see our overview of all legal ways to stay in Thailand, including DTV and retirement visa.
Important! The visa fee is not refunded if your application is refused. The multiple-entry fee is also not refunded if you are approved only for a single-entry visa.
Key principles for getting a TR visa
Apply only outside Thailand
You cannot get a TR visa while in Thailand. You must apply from another country – it does not matter which city, as long as you are physically in that country at the time of application and can prove it. The best places to apply from in Southeast Asia:
- Laos – Savannakhet or Vientiane
- Vietnam – Ho Chi Minh City or Hanoi
- Malaysia – Kuala Lumpur, Penang, Kota Bharu
You can find the full list of countries and cities where you can apply on the official website. Go to the new visa application section and enter the country in the "Current location" field – you will see the available options.
From Russia, the visa is submitted through the consulate in Moscow – everything is done online from anywhere in the country, but cash payment is only in Moscow; more on that below.
Fully electronic application
The entire application process is now online at https://www.thaievisa.go.th/. This is the only official website; there is no replacement app. Other websites and apps may be scams.
You create an account linked to your email, fill out the form, upload scans of documents, and submit the application. You do not need to visit the embassy. The finished visa is sent to your email – you need to print it and show it at passport control when entering Thailand.
Conveniently, you can submit up to 10 visa applications at once from one account – for example, for the whole family or a group of travelers.
It is more convenient to fill out the form on a computer rather than a smartphone. If you plan to apply from abroad, you can fill out a draft at home in advance, then upload the entry stamp on the spot and submit the application. The draft is saved for 14 days.
The website may not open directly from Russia due to blocks. According to user reports, it depends on the provider and maybe even your geographic location. If it does not open for you, you will have to use a workaround.
Paying the visa fee
In most countries, the visa fee is paid online by bank card. But cards from Russian banks are not accepted anywhere in any form – including UnionPay.
The exception is applying in Laos, Myanmar, and Russia. Here the application and documents are uploaded online, but the fee must be paid in person at the embassy in cash. After submitting the application, print the accompanying document and take it with you – without the paper version, they may not accept the money. Anyone can pay, not necessarily the applicant.
- In Moscow, payment is cash only, strictly in US dollar bills (blue with security strip, clean, no stamps or writing). The embassy in Moscow is at 6 Serpov Lane (Park Kultury metro station). Cash payment of the visa fee in US dollars is accepted Monday to Friday, 9:30 to 12:30, within 14 days of receiving the confirmation document. You can always check current information on the official embassy website
- In Laos, payment in Vientiane and Savannakhet is cash in Thai baht
Visa fees:
- Single entry – 40 USD (40 USD)
- Multiple entry (METV) – 200 USD (200 USD)
These are the general official prices, but they may differ slightly in different countries. For example, in Laos a single-entry visa costs 1,000 baht in cash (29.75 USD), which is even lower than 40 US dollars.
Processing times and trip planning
There are no official guaranteed processing times – it all depends on how busy the specific consulate is. In practice, the visa is most often approved within 5–10 working days. But if staff have questions about the documents, they will ask you to upload something else – the time increases. Sometimes an application can be processed in a couple of days, and sometimes it can drag on for up to two weeks.
Important: you can apply no earlier than 3 months before your planned entry, because the visa is valid for 3 months from the date of issue. If you apply too early, the visa may expire before your trip. The best time to apply is 3–4 weeks before departure.
If you apply in Russia, allow at least a month before the trip. This gives you a buffer in case of additional requests. Officially, processing in Moscow takes up to 14 working days from payment, but in practice it may take longer.
If you apply from Laos, Vietnam, or Malaysia, be prepared to spend up to two weeks in the country where you apply. Or plan for a hotel extension and flexible tickets from the start.
How to improve your chances of approval
The consulate decides whether to issue the visa, and no one can guarantee anything. But there are proven principles that help you present yourself as a real tourist and reduce the risk of refusal:
- Show more money in your account. An amount above the minimum threshold works in your favor. The consulate wants to see that you have funds for the trip (the official guideline is at least 20,000 baht per person or 40,000 baht per family).
- Show money in your account not only as of the statement issue date. It is better to show a statement with transactions for the last 3 months.
- Upload real return tickets or tickets to a third country. Ideally, departure from Thailand within 90 days after entry (60 days of visa + 30 days extension). Fake bookings and just a "trip plan" without tickets greatly increase the risk of refusal.
- If you do not want to buy tickets in advance. You can make a temporary flight booking on specialized websites – search online for "flight booking for visa", options start from 750 rubles. Or buy a bus, train, or ferry ticket out of Thailand with cancellation – for example, through Trip.com (accepts Russian cards) or 12go.asia (does not accept Russian cards).
- Show a real paid hotel booking or rental agreement. A pay-on-arrival booking (as often happens on Booking) is less convincing than prepaid accommodation.
- Prove that you are actually traveling. If you apply in Vientiane and two weeks later you have a hotel booked in Pakse and a ticket onward along the route – that is a good signal. Show that you are exploring the region, not just waiting for the visa.
- Confirm that you are legally in the country of application. You will need to upload a scan of the entry stamp in your passport or the visa for that country, as well as a hotel booking. In some cases, they may ask for photos of all passport pages with stamps, your registered address, and even a fresh photo with a local newspaper or in front of a recognizable landmark.
The main principle: show that you are a tourist with money, plans, and a return ticket. Then your chances of approval increase noticeably.
What documents and requirements
Before submitting your application, prepare all documents in advance – it is more convenient and faster. Note the technical requirements for files: each document must be in PDF or JPEG format, no larger than 3 MB. Some forms require uploading strictly one file, so you may need to merge several pages into one PDF – there are online services for this, but doing it on mobile is inconvenient.
Here is what is usually required for a TR visa application:
- Passport. Scan of the page with your photo and data. Passport must be valid for at least 6 months from the planned date of entry into Thailand.
- Photo. Recent passport-style photo on a light background, without glasses or headwear, taken within the last 6 months.
- Round-trip tickets (or tickets to a third country). Real, not fake bookings. Departure from Thailand must be within the permitted stay.
- Hotel booking or rental agreement. Preferably with confirmed payment, not pay-on-arrival.
- Proof of funds. Bank statement or certificate showing funds. Amount must be at least the equivalent of 20,000 baht (595 USD) per person or 40,000 baht (1190 USD) per family.
- Proof of your location in the country of application. Scan of entry stamp in your passport, visa for that country, or another document confirming legal entry.
- Additional documents upon request. The consulate may request photos of all passport pages, registered address, domestic transport bookings, and other proof.
All documents must be in English or Thai. Electronic bank statements are accepted as proof of funds. In the apps of most Russian banks or in web banking, such statements are available; look for "visa statement". For example, Alfa-Bank, T-Bank, and Sberbank have it, and it is free. But some banks do not provide this feature and send you to a branch for a paid certificate, for example RSHB and VTB. The cost is about 200 rubles.
Important! No statements from brokerage or investment accounts, scans of crypto wallets, certificates of the value of real or movable property, and the like will work. For consuls, when checking documents, it is important to make sure that you have real free financial funds that you can legally dispose of to pay for your stay during the trip, and not just the presence of some assets.
Requirements for children
A separate visa application is submitted for children, and it can and is better done by parents from one account. But there are some nuances:
-
When applying for schoolchildren and students, choose the occupation Student; in the additional field you will need to enter the place of study in Latin letters.
-
When applying for preschoolers, choose the occupation Other, and in the additional field write Child.
In the "Income" field for children, honestly enter – 0.
On the file upload page in the Financial evidence: an amount of no less than 20,000 THB section, upload the same bank statement that you uploaded for yourself. Of course, the funds there must be more than 20,000. But here is an important point: the statement must show the relationship. It is good if you have the same last name, then there should not be any particular questions. But if the last name in the statement differs from the child's, there are two options (it is better to do both to increase your chances):
- Attach a notarized translation into English of the birth certificate.
- Attach a sponsorship letter signed by you (sample below).
All these documents must be merged into one PDF for upload.
If the children have their own account (T-Bank and Alfa-Bank allow opening one from age 14), you can upload their statement, and then there will be no problems at all.
Is a power of attorney / consent for the child needed?
No, for the visa and entry with a parent, a power of attorney is not needed. It is also not needed if the child is traveling even with only one of the parents. A power of attorney is needed only if the child is traveling without parents or the second parent has filed a request banning departure. There is no need to translate the power of attorney into English; it is requested on departure from Russia only by Russian border guards, and Russian is enough for them.
Sample sponsorship letter
SPONSORSHIP LETTER
To: The Embassy / Consulate General of the Kingdom of Thailand
Date: [Date in DD.MM.YYYY format]
I, [Your full name in English, as in your passport], passport No. [Your passport series and number], declare that I am sponsoring the tourist trip of my [specify: son or daughter], [Child's full name in English, as in the passport], passport No. [Child's passport series and number], to Thailand from [Entry date DD.MM.YYYY] to [Departure date DD.MM.YYYY].
I officially guarantee that I will fully cover all their travel expenses, including international and domestic flights, accommodation, daily living costs, and medical insurance during the entire period of their stay in the Kingdom of Thailand.
My financial documents (bank statement and proof of income) are attached to this visa application.
Sponsor's contact details:
Phone: [Your phone number]
Email: [Your Email]
Signature: __________________
[Your signature]
Step-by-step guide with screenshots
Now let us go through the entire TR visa application process on the official website in detail – step by step, with screenshots and explanations. The guide is arranged in the order you will go through the process: from creating an account and choosing the visa type to the final review of the application and receiving the finished visa by email. We recommend reading the whole section first, then following the steps in order, checking the screenshots.
The website has several languages, including Russian. The language choice does not affect the document format or the decision, so you can choose whichever is easiest for you.
And one more useful point: the application draft is saved for 14 days. If you plan to apply from abroad, you can fill out the draft at home on a computer in advance, then upload the entry stamp on the spot and submit the application.
Registration / creating an account
To submit a visa application, you first need to create an account linked to your email.
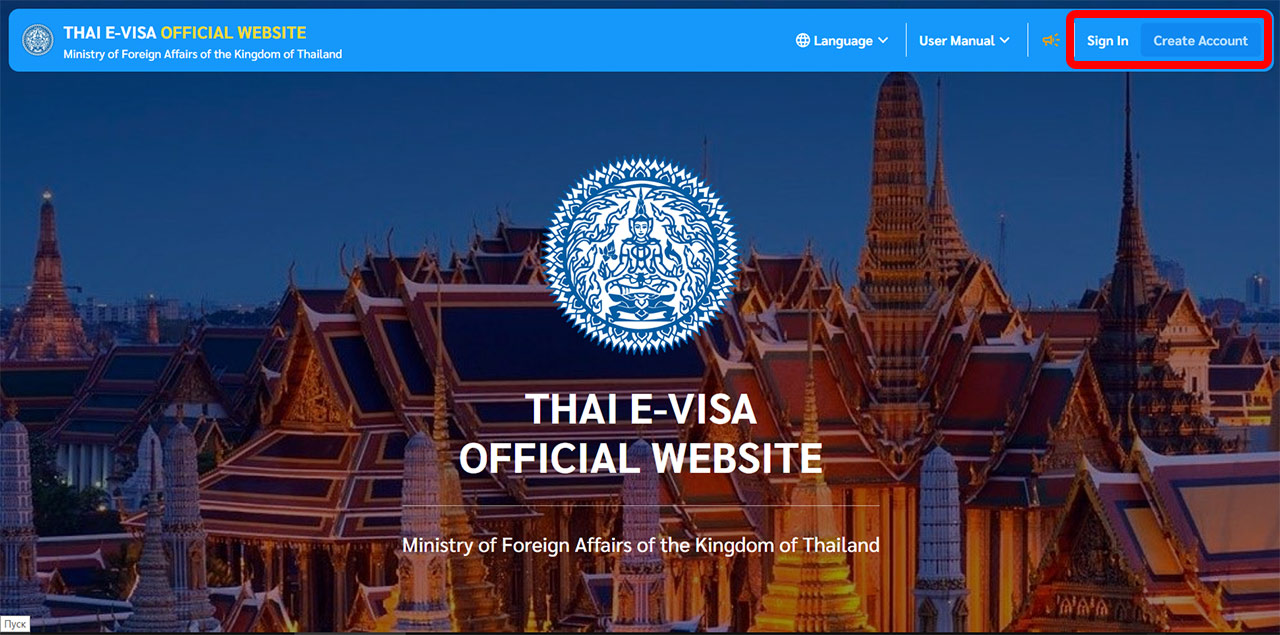
Open the official website https://www.thaievisa.go.th/ and click Create Account. If you already created an account earlier, click Sign In.
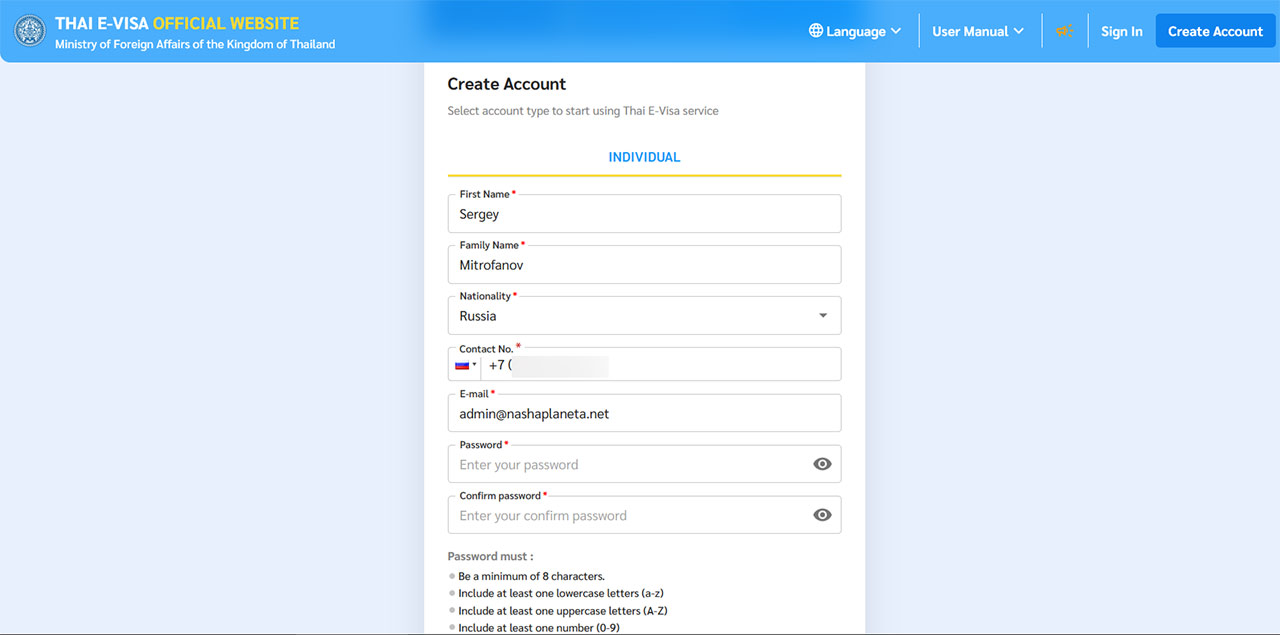
The registration form will open with the usual fields: enter your name, phone number, email, and create a password. There should be no difficulties here.
Creating a new visa application
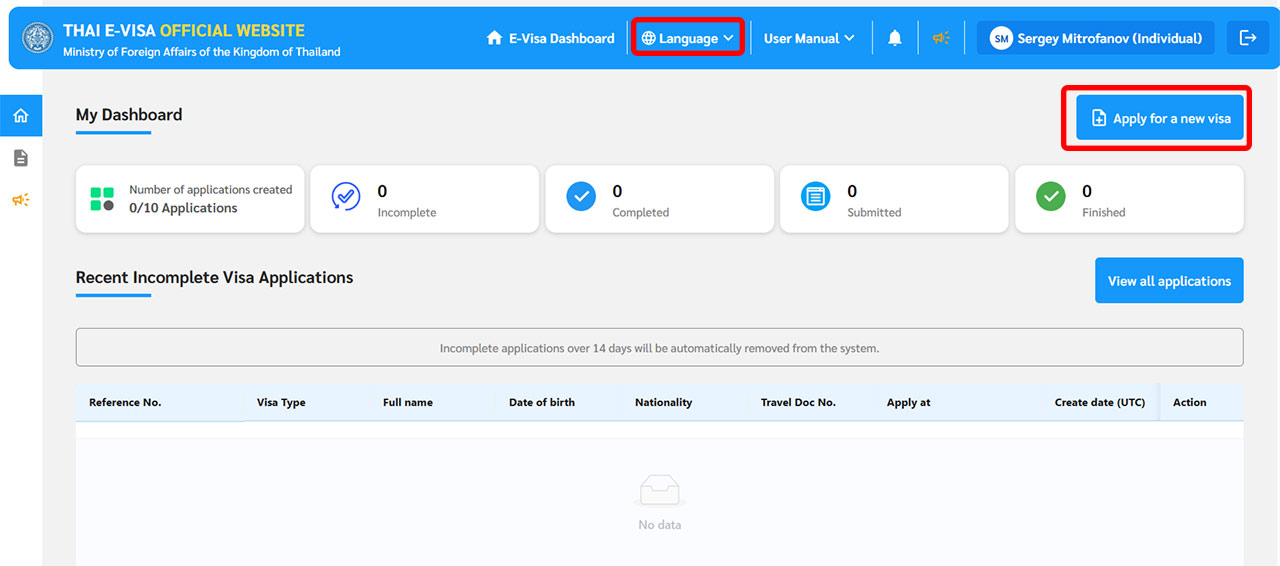
Once you register and log in to your account, you can change the interface language (Language button).
To start filling out a new visa application, click "Apply for a new visa".
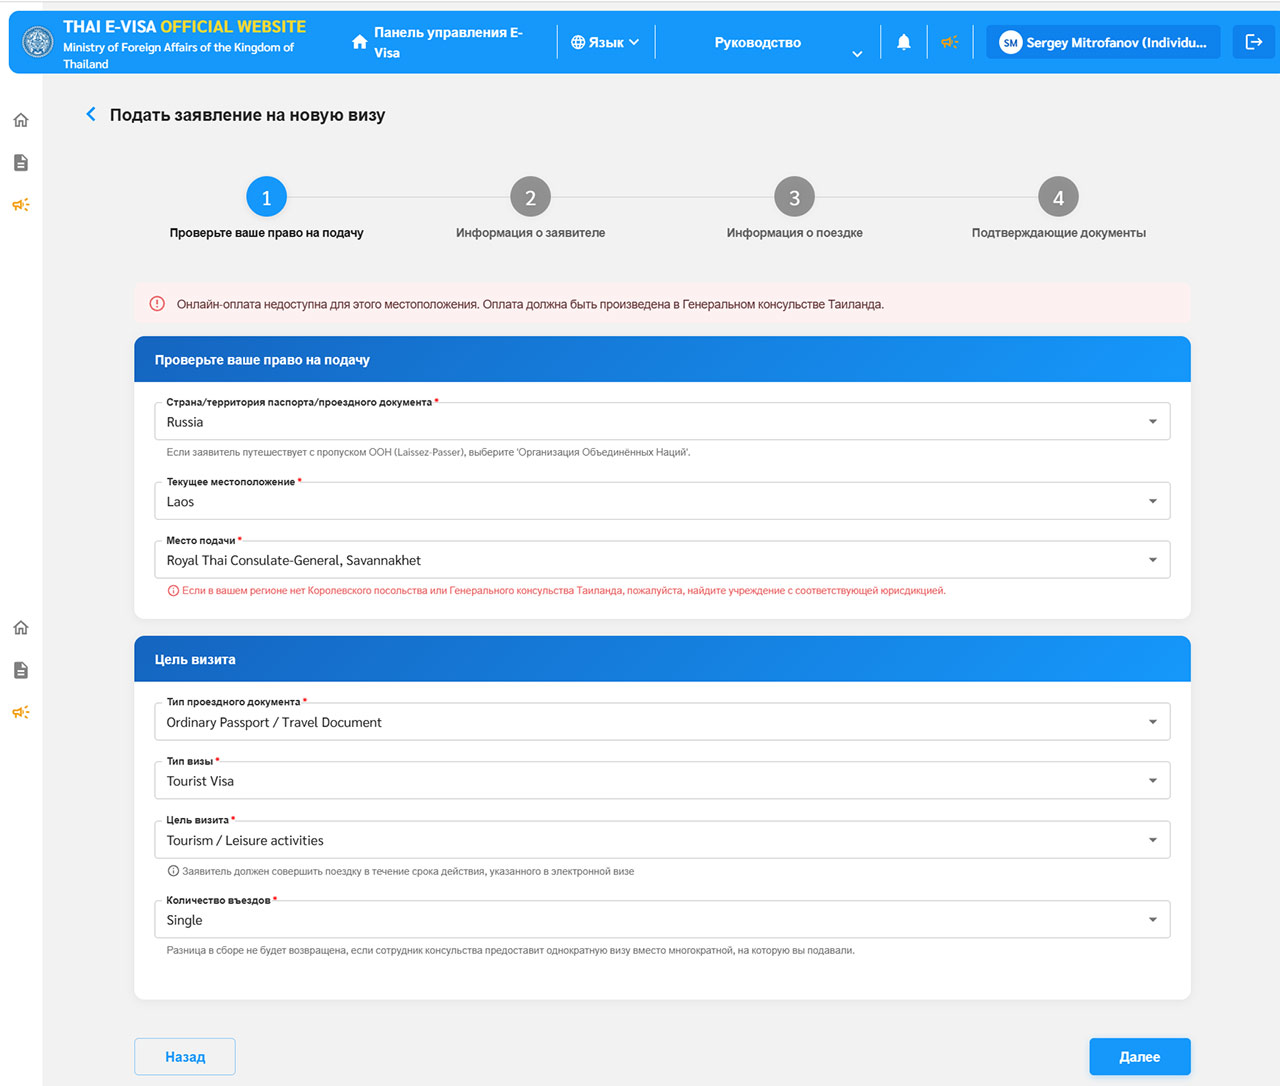
Filling out the application, step 1 (choosing consulate and visa type)
On the first screen, choose your country of residence, country where you will get the visa, consulate, type of document, and visa type.
As a reminder: choose the country of application strictly as the one where you will stay the entire time while the visa is being processed. To verify your presence in the country, they may request additional documents, even a selfie with a local newspaper or in front of a famous landmark. Sometimes they ask you to upload all pages of your passport to make sure no new entry/exit stamp has appeared. If you leave the country before the visa is approved, processing may be canceled.
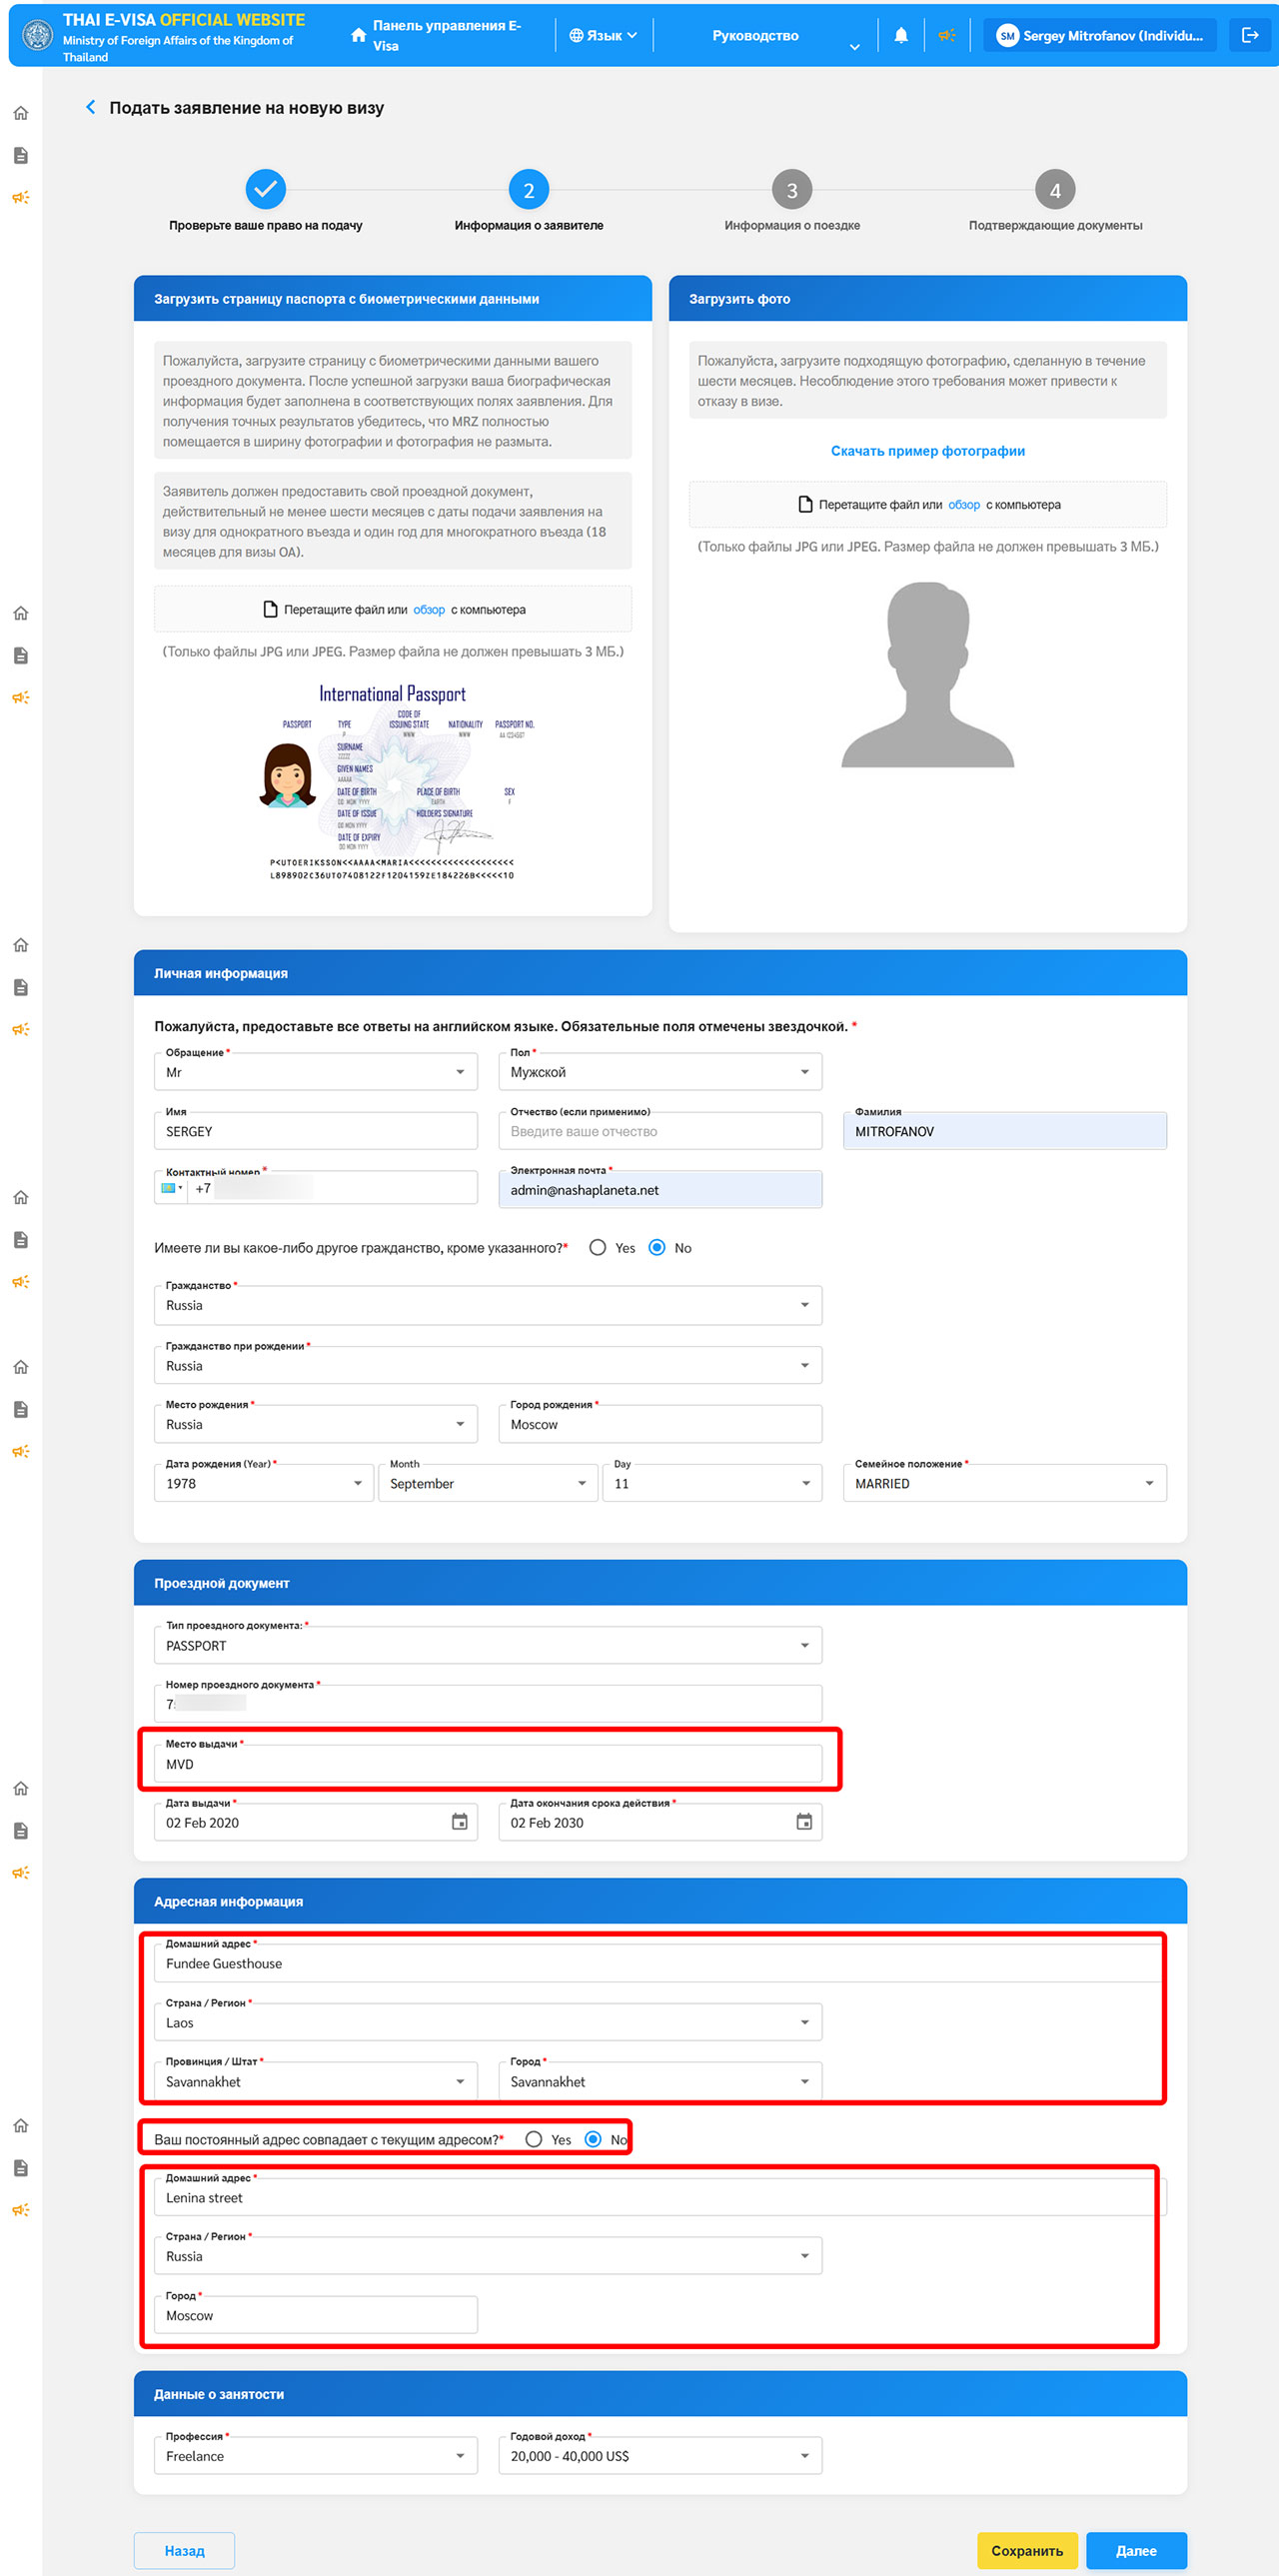
Filling out the application, step 2 (personal information)
On the second screen, enter your personal information. Everything is filled out logically, but there are a few points to explain in more detail:
-
Upload the passport page with biometric data
Upload a passport scan with a clearly readable MRZ zone. This is a special text block of letters, numbers, and arrow symbols located at the bottom of the main passport page.
It is better to prepare this file in advance on a PC by scanning, because it is hard to get good quality on a smartphone. But if there is no other way, try it; you may have to take the photo several times in good lighting without glare. Immediately after uploading, you will get a message whether the image is suitable or not.
-
Upload a photo
You need to upload a good-quality photo of your face on a light background without glasses or headwear and with the right proportions. You can open photo examples here via the link and make sure everything is standard.
If you do not want to go to a photo studio for a passport photo, you can do it yourself, but you will need to clean up the background. Nowadays this is easily solved with online background removal and image enhancement services, many of them free.
-
Address information section
- If you are applying in your own country, enter your actual residential address here. If your actual address differs from your registered address, switch "Does your permanent address match your current address?" to "Yes" and fill out another form with your registered address.
- If you are applying in another country, enter your actual address of the current hotel or rental housing here. For example, if you came to Laos for the visa, enter the hotel in Laos. Also switch "Does your permanent address match your current address?" to "Yes" and fill out another form with your residential/registered address in your home country.
-
Field "Travel document / place of issue"
Find the "Authority" field in your passport and enter it in this form, transliterated into Latin letters, for example MVD 54001 or FMS 7701.
Filling out the application, step 3 (trip plan)
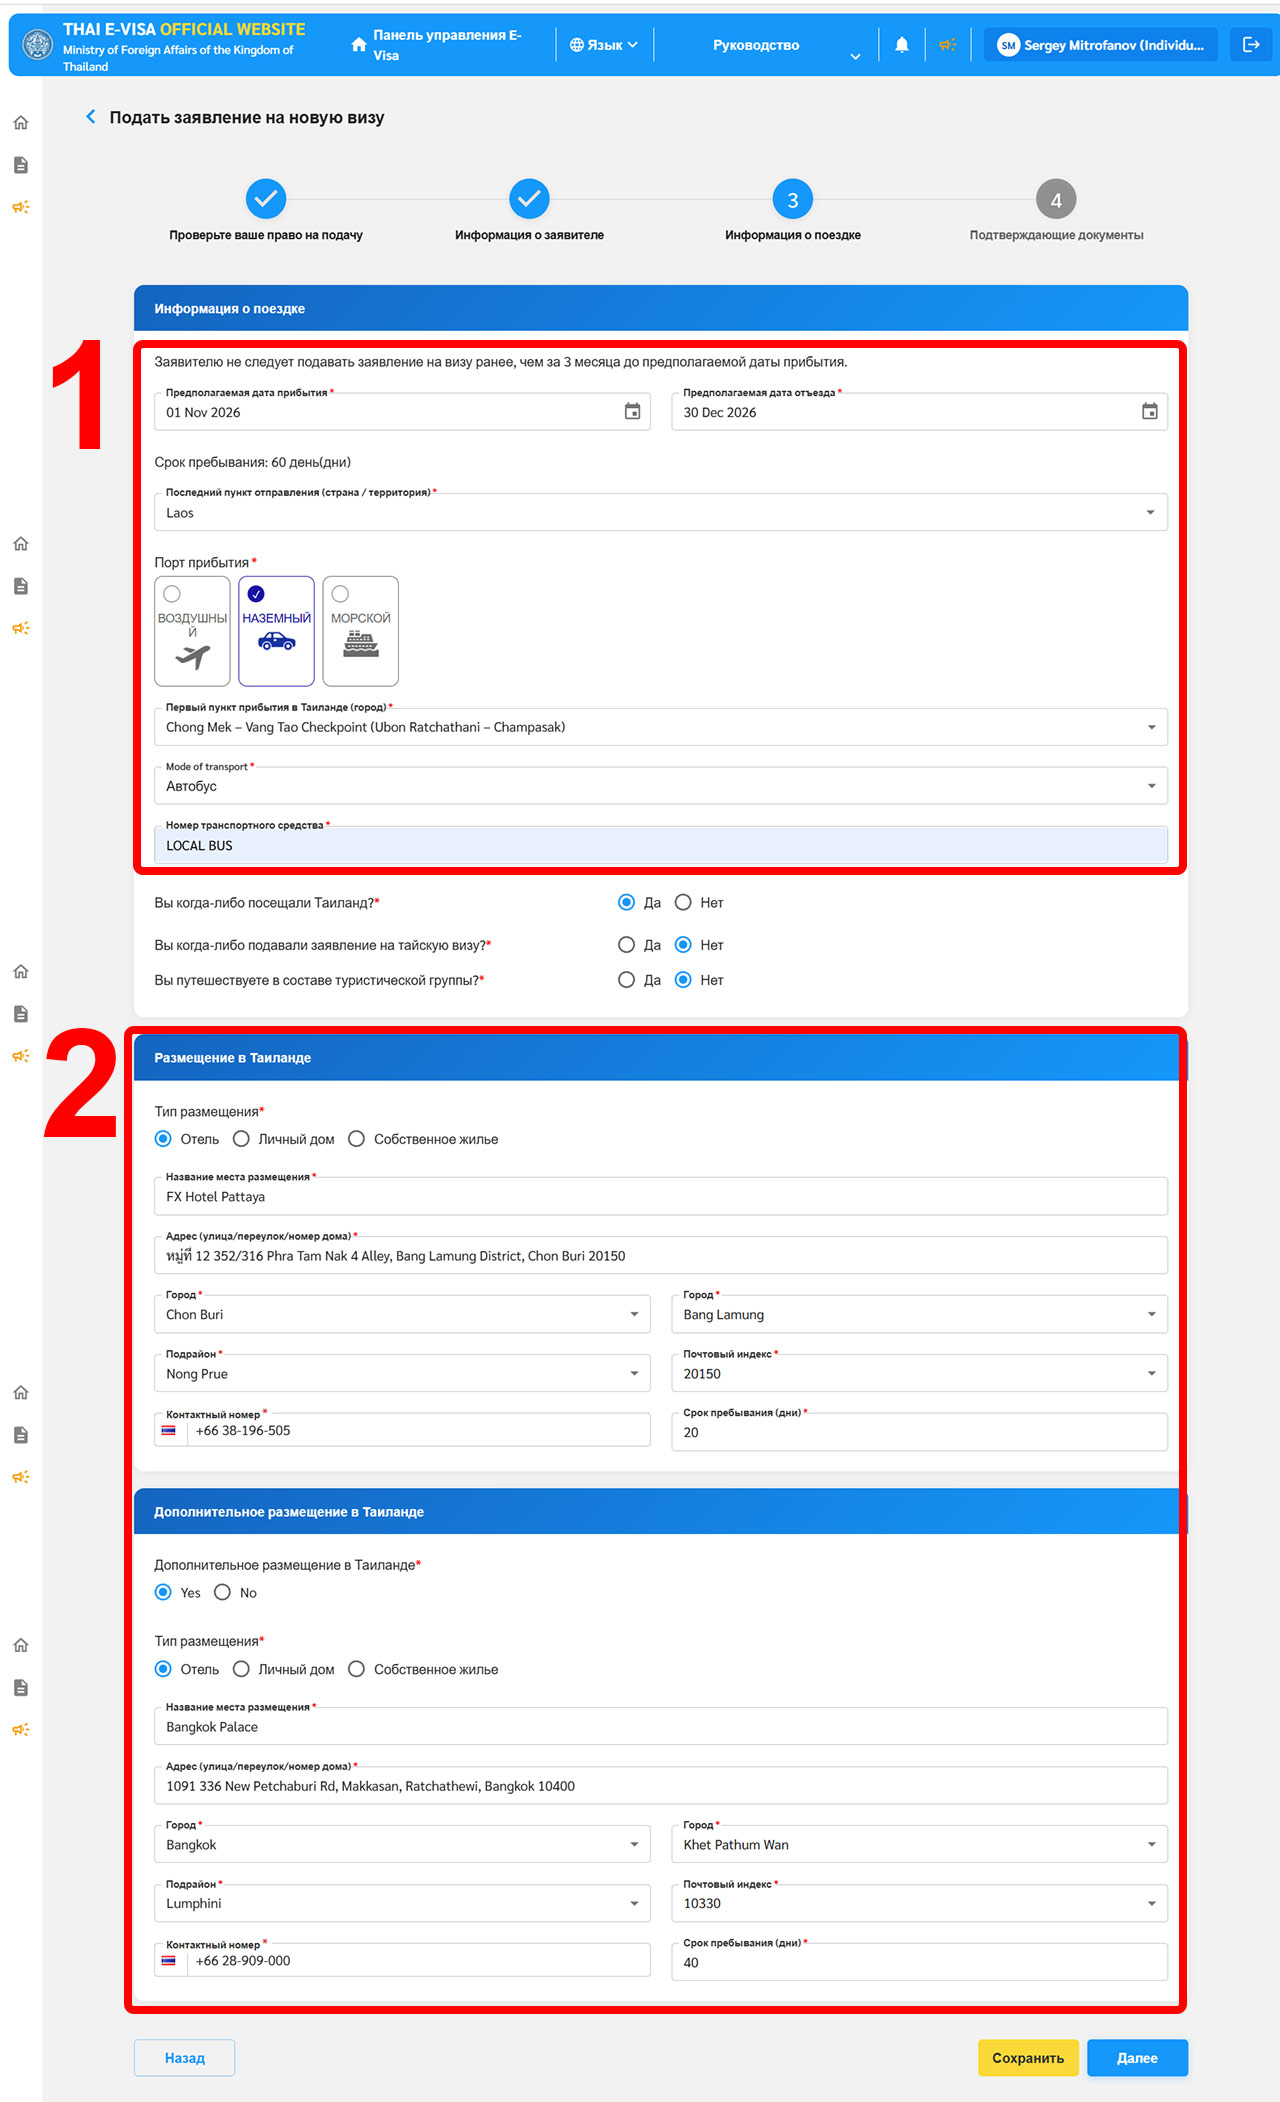
On this page, fill in the trip information, and this is where most questions arise. In the screenshot, we marked these important points with numbers, and in the text below we explain what to fill in and how. Overall, all the data is your declared trip plan, but the visa itself is not strictly tied to dates or flights: if your plans change later, the visa will still be valid.
-
1. "Trip information"
Planned travel dates
Here you need to enter the dates when you plan to enter and when you plan to leave. It seems a little illogical, because the visa is valid for 3 months from issue and you can enter Thailand on any date during that time. But it is assumed that when filling out the form you should already have a ready travel plan and all tickets, so you need to enter the dates from your tickets.
So at the time of application, you are submitting everything as if it is real according to your plan, and all these dates are needed for the consulate to evaluate your route during processing.
What should I do if I want to extend the visa in Thailand at an immigration office for another 30 days, but the departure tickets are already bought for a date more than 60 days later? There is no clear answer; it all depends on the situation and the specific consulate. They may refuse, since the 30-day extension is not guaranteed, or they may approve all 60+30 days; such decisions also happen. But the best option is to additionally buy a booking on specialized websites or an expensive refundable ticket with departure no later than 60 days after entry; then your chances of visa approval increase significantly.
Last point of departure (country/territory)
Here you need to enter the country from which you directly plan to enter. The logic is:
- If you have a direct ticket from Russia or another country, or a ticket with a transfer without leaving the international zone at the transfer airport, you can enter Russia or your country.
- If you have a transfer with leaving the international zone and staying in the transfer country, enter the transfer country. For example, if you fly through China and stay there even 1–2 days, enter China.
- If you travel by land or ferry from Laos, Cambodia, or Malaysia, enter that country. Note here: if you apply for the visa in Vietnam and plan to travel by land through Laos, your country of departure will be Laos.
Point of arrival in Thailand
After choosing the type of transport from the list, you need to choose the airport, port, or land border crossing through which you plan to enter. It must match your ticket. That is, if you are flying for a vacation to Pattaya but your plane arrives at Bangkok Suvarnabhumi Airport, you need to choose Suvarnabhumi.
Transport number
This is the flight or ferry number you will arrive on. For planes, the flight number is in the itinerary receipt; if you enter by land or ferry, enter everything you know so the consulate officer understands your plan. For example, for arrival by ferry from Langkawi, we entered the carrier company and route as plain text "Bundhaya Ferry Langkawi-Ko Lipe", and for entry from Laos by local bus without a number, just "Local Bus". But keep in mind that this will not work everywhere. For example, the consul in Moscow may not understand such a route at all and will request additional explanations and tickets to Laos. But if you apply in Laos, this is common practice and there will be no questions.
2. "Accommodation in Thailand and Additional accommodation in Thailand"
Here enter the specific details of your hotels or rental housing. You can list only two properties (hotels):
- Address. You will find it in the booking information or on Google Maps. You need to remove all commas from the address; the system does not accept them. Here you also choose the city and subdistrict from the list. The address system in Thailand is very confusing; it goes from province down to microdistrict. For example, you will not even find the city of Pattaya in the list; it is not there. So use the address, or ask modern AI chats to break down the full Thai address by copying it in full. For example: "help me break down the Thai address into districts and subdistricts: หมู่ที่ 12 352/316 Phra Tam Nak 4 Alley, Bang Lamung District, Chon Buri 20150, Thailand".
- Contact phone number: for a hotel, it is easy to find on maps or in the booking; for rented/private housing, enter the landlord's number or your own.
- Length of stay: how many days you plan to stay at this address.
And here questions arise if you have a complex trip. The thing is, your length of stay in days between the arrival and departure dates (indicated above on the page) must exactly equal the length of stay you enter here. Here is how to solve it:
- I am staying in several places, but only two can be listed here? For the first hotel/accommodation, enter exactly as many days as in the actual booking, and for the second place of stay, enter a number so that the total matches the length of stay. Then collect all your bookings into one PDF file and upload it in the documents section. Consuls know about this situation, and everyone accepts it.
- I only have a booking for one hotel for a few days, and the rest of the plan is unknown? Make a second booking with free cancellation on Trip.com or other sites, or a free-cancellation pay-on-arrival booking on Booking.com for the remaining period, and enter it.
- I want to arrive and rent housing on the spot; what should I enter? You will again have to work around the system and make a cancellable booking or a booking without payment.
- I have my own place or a remotely signed rental agreement; what should I enter? For your own place, enter your address and your Thai phone number or the residential complex number, and upload the chanote or BlueBook in the next step. For rented housing, enter the address and the owner's phone number, and upload the rental agreement.
Filling out the application, step 4 (uploading documents)
All documents must be in English (or with a notarized translation if they are in Russian or another language, for example a bank statement) and in good quality (clear scans or photos without cut-off edges).
Only PDF, JPG, or JPEG files with a maximum size of 3 MB per file can be uploaded. Only one file can be uploaded per item, so you will have to do some magic here:
- If you need to upload several documents, merge them into one PDF. There are many free online services for this; you can easily find them in search engines with queries like "merge documents into one PDF free"
- If you need to compress a document to 3 MB, again use online compressors like "Compress PDF" or "Compress JPG"
In theory, you can do all this on a desktop PC with programs, but it is more complicated because you will have to download and possibly buy a license for such programs.
Now let us go through the documents:
- Passport or travel document biographical data page
Upload the main spread of your passport here. Yes, the same thing you uploaded earlier.
- Photograph taken within the last six months
Your digital visa photo. Yes, the same photo you uploaded earlier. Important: the photo must have been taken no earlier than 6 months ago.
- Document indicating current location (e.g., valid visa, receipt(s)/proof(s) of payment of airline tickets...)
Documents confirming that you are in the country of application. You will need to merge them into one file, as mentioned above.
- If applying in Laos, Vietnam, etc., upload your visa and/or a recent entry stamp from your passport; booking of the hotel where you are currently staying.
- If applying in Moscow, it is recommended to upload the spread of your Russian internal passport and the page with registration, as well as all passport pages where it can be seen (to confirm that you have not crossed the border to leave Russia or enter Thailand). The last item (all passport pages) may be excessive, but in reviews tourists say that sometimes the consulate asks to upload it.
- Travel Booking Confirmation
Confirmation of your transport tickets (entry to Thailand and exit from it).
- If the tickets are purchased and match the 60-day stay, feel free to upload them. As we wrote above, cases with 60+30 days extension also work, but there is no guarantee.
- If you do not have tickets yet or they are incomplete (no return), and you do not want to or cannot buy them now, buy refundable tickets or bookings on specialized sites that you can find by searching for "tickets for visa". Honestly, the first scheme with buying refundable airline tickets at higher fares almost does not work now, except perhaps through loyalty programs and only on airline websites. So it is better to count on the second option (the most reliable), or buy refundable tickets for ferries or train/bus/transfer by land (less reliable, but it works).
- If you plan to enter by land from Laos, Malaysia, or Cambodia by local transport or in your own/rented vehicle, instead of entry tickets you can upload a description of your route (Travel Itinerary / Cover Letter) in English with dates and border crossings. You can make this description as plain text in any editor like Word and attach your exit/departure tickets to it.
- Proof of accommodation in Thailand
Upload your hotel bookings, chanote, or rental agreement here. Everything you upload must match what you entered on the previous page in the "Accommodation in Thailand and Additional accommodation in Thailand" sections, and it must cover the entire period of your stay in Thailand by dates.
If you are going to friends/relatives, you can upload an Invitation Letter in free form in English, attaching a scan of the host's ID card/passport and documents for the housing (chanote).
- Financial evidence: an amount of no less than 20,000 THB
This is proof that you have enough money for your stay; at least 20,000 baht per person is required. The currency does not matter; any currency is accepted and converted at the current rate. But it is better to show the amount with a buffer.
The statement or certificate must be in English and with a stamp. Nowadays many banks, including Russian ones, issue such statements automatically, instantly, and free of charge. At least Tinkoff/Sber/Alfa do this in their app and web account.
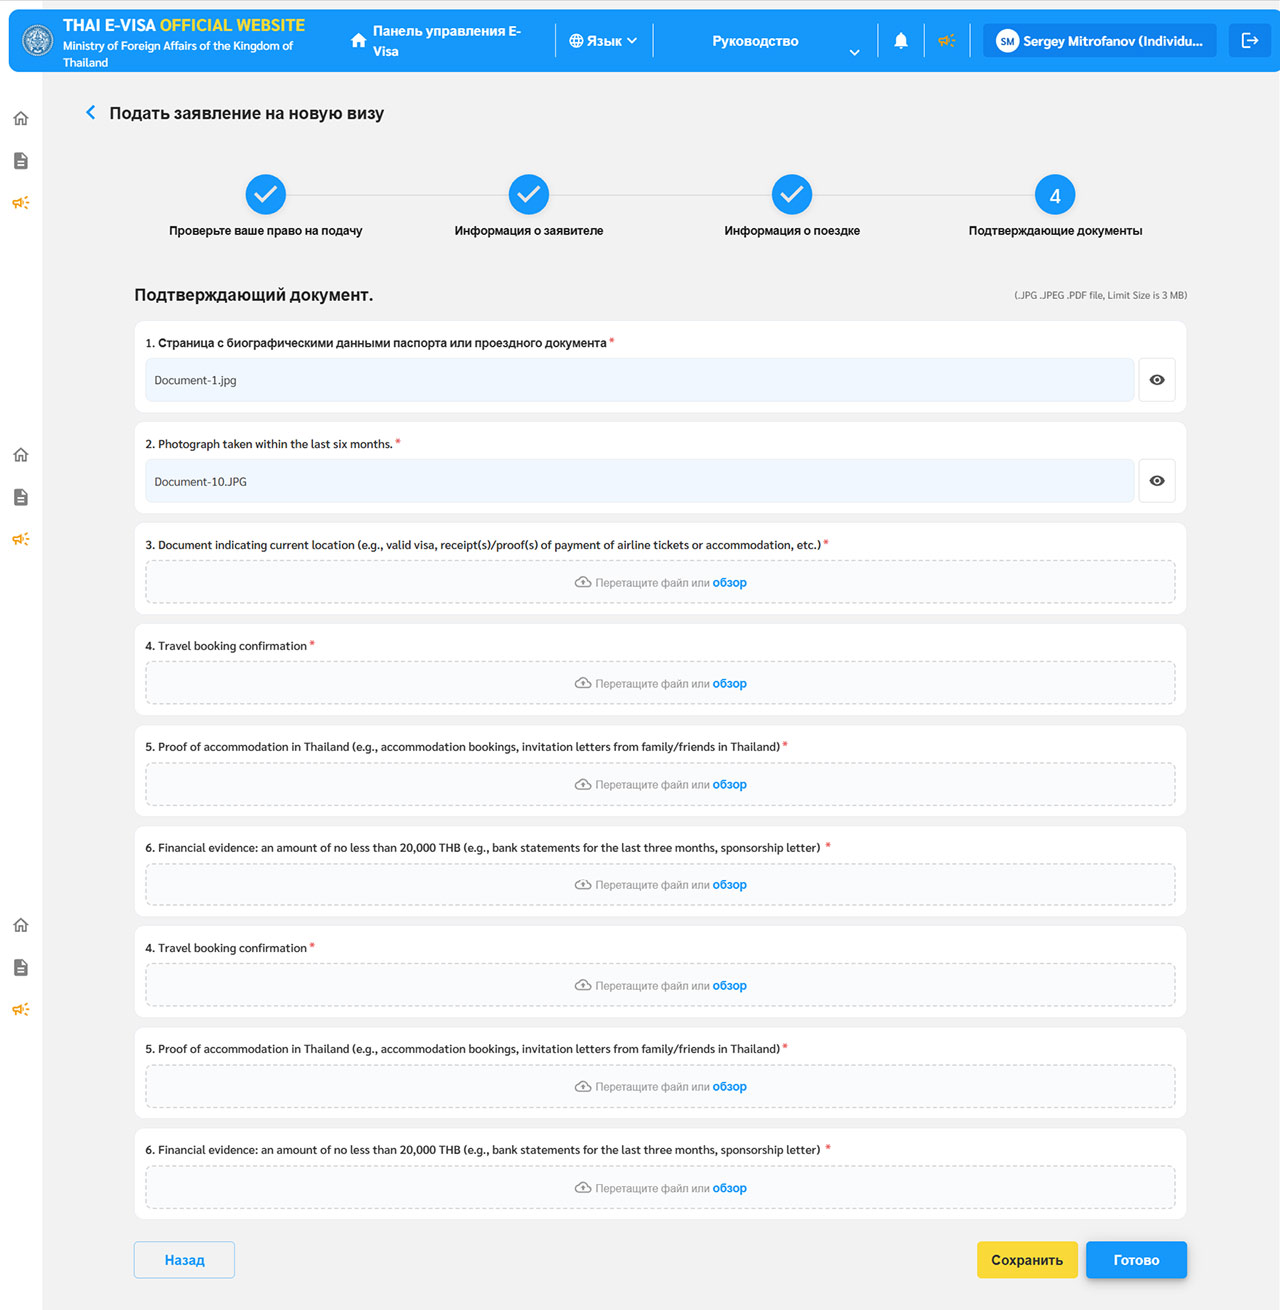
Uploading documents is the last step of the application. After this page, you will see the entire application with all entered data and attached files for review. After submission, it will be impossible to fix mistakes (for example, a typo in the passport number or date of birth). If everything is correct, click the confirmation button.
Then the system will redirect you to the payment page. But for Russia, Laos, and Myanmar this is not relevant; payment is cash only. So here you will receive information about working hours and the payment method.
As soon as payment goes through, the application is officially considered submitted. You will receive a confirmation email, and the status in your account will change to Pending.
After that, wait 5 to 10 working days and periodically check your email in case a message arrives asking you to upload or correct something. When the visa is approved, the status will change to Approved, and the Electronic Visa file will be sent to your email.
Extending your visa in Thailand
If 60 days have flown by unnoticed and you do not want to leave yet, you can extend the visa for another 30 days. This is done at the Thai immigration office – the one that covers the province where you are staying.
The extension is filed using form TM7. Here is what you will need:
- Completed TM7 form. You can download it in advance or get it at the office.
- Passport. Original, valid for at least 6 months, with a free page for the stamp.
- Copies of passport pages. Biographical page, page with the current visa, page with the last entry stamp. Copies are signed with a blue pen.
- 4×6 cm photo. Taken recently.
- TM30 receipt. Confirmation of address registration from the hotel or landlord. Without a current TM30, the extension will not be processed.
- Hotel booking or rental agreement. Confirmation of place of stay.
- Return ticket. Confirmation that you plan to leave the country.
The extension fee is 1,900 THB (56.53 USD). Payment in cash in Thai baht.
It is recommended to submit documents about a week before the visa expires so there is a buffer for processing. Overstaying carries a fine of 500 baht per day – so it is better not to delay.
Important: the extension is not guaranteed and may be denied. You cannot extend the same stamp again – after using the extension, you must either leave Thailand or get a new visa.
What to do if you are refused
A refusal is unpleasant, but it is not the end. The visa fee is not refunded, but you can apply again. The main thing is not to submit the same documents again: this will almost certainly lead to another refusal.
First, figure out the reason. Most often, refusals happen because of:
- Insufficient funds in the account or no transaction activity;
- Fake or unconfirmed ticket and hotel bookings;
- Mismatch between the declared trip plan and the actual documents;
- Mistakes in the application – typos in the passport number, dates, or names.
If you get a refusal, here is what you can do:
- Apply again at another consulate. Different embassies interpret requirements differently – what was not accepted in one may be approved in another.
- Strengthen weak points. Add more funds to the account, show a 3-month statement, get real refundable tickets instead of bookings.
- Fix mistakes in the application. Double-check all data before resubmitting.
It is better not to reapply immediately, but after you eliminate the reason for refusal. Sometimes it is enough to simply change the consulate or add the missing documents.
If something went wrong in the process or you still have questions, join our 💬 Thailand chat; we will help you figure it out.